
How to Create Clear & Easy-to-Read Technical Drawings for Contractors
13 Essential Checks Before Issuing Your Drawing Set
Introduction
You've spent weeks developing the design, selecting materials, refining layouts, and preparing drawings. But before sending your construction documentation to the contractor, one final review can make a significant difference.
A clear, coordinated drawing package helps communicate your design intent, reduces unnecessary questions, and minimizes costly misunderstandings during construction.
This checklist isn't about creating more drawings. It's about making sure the information you've already prepared is complete, coordinated, and easy to understand.
Whether you're working on a kitchen renovation or a full home remodel, these are the items worth reviewing before issuing your drawing set.
1. Start with a Clear Floor Plan
Your floor plan is the foundation of the entire drawing package. It should clearly show the layout of the space, including walls, doors, windows, cabinetry, furniture, and key fixtures.
Contractors often use the floor plan as their starting point, so keeping it clean and easy to read helps every trade understand the project from the beginning.
Why it matters:
The floor plan is often the first drawing a contractor reviews. It creates a common reference point for everyone involved and helps them understand the overall organization of the space before looking at more detailed drawings.
Quick Check
✔ Overall layout is clear
✔ Cabinets and fixtures are located
✔ Drawing references are correct
2. Check Every Critical Dimension
Critical dimensions should be clearly shown so the contractor does not need to estimate measurements or scale them from the drawing.
Depending on the project, this may include overall room dimensions, wall lengths, door and window positions, cabinetry widths, fixture locations, clearances, centerlines, and distances between important elements.
Dimensions should be organized logically and kept clear of other notes and symbols. It is also important to avoid duplicated or conflicting dimensions across different drawings.
Contractors should still verify existing site conditions before fabrication or installation.
Why it matters:
Clear dimensions reduce assumptions and make it easier to coordinate cabinetry, fixtures, furniture, lighting, and other elements. They also help identify potential conflicts before work begins.
Quick Check
✔ Overall dimensions included
✔ Cabinet dimensions verified
✔ No conflicting dimensions
3. Include Interior Elevations
Interior elevations show straight-on views of important walls and communicate information that cannot be understood from the floor plan alone.
They can show cabinetry, built-ins, tile layouts, wall finishes, mirrors, plumbing fixtures, lighting, shelving, artwork locations, trim, and other design features.
Important heights, widths, alignments, material changes, and installation relationships should be clearly identified. Elevations should also reference relevant schedules, specifications, or enlarged details where additional information is required.
Why it matters:
A floor plan shows where an element is located, but an elevation shows how it should look and how the different components should align. This helps contractors interpret the design more accurately.
Quick Check
✔ Key walls shown
✔ Cabinet elevations complete
✔ Tile layouts included
4. Coordinate Electrical & Lighting Plans
Electrical and lighting plans should clearly show the intended locations of light fixtures, switches, outlets, controls, and other electrical elements within the interior design scope.
Lighting fixtures should be labeled and coordinated with the reflected ceiling plan, interior elevations, cabinetry, furniture, and architectural features.
Where helpful, include switch relationships, mounting heights, outlet types, decorative fixture references, and notes for special requirements such as under-cabinet lighting or integrated millwork lighting.
Final electrical design and installation requirements may need to be reviewed by a licensed electrician or engineer.
Why it matters:
Lighting and electrical elements affect both the appearance and functionality of the finished space. Clear plans help prevent poorly positioned fixtures, inaccessible outlets, and avoidable changes during installation.
Quick Check
✔ Fixtures identified
✔ Switches located
✔ Lighting coordinated
5. Confirm Plumbing Locations
Plumbing information should identify the intended locations of sinks, faucets, toilets, showers, tubs, drains, appliances, and other plumbing fixtures relevant to the interior design.
Plans and elevations can be used together to show fixture positions, centerlines, mounting heights, and relationships with cabinetry, countertops, tile, and surrounding elements.
Product specifications should be included when a selected fixture has particular installation requirements.
All locations should be verified against existing site conditions and coordinated with the contractor and licensed plumbing professionals.
Why it matters:
Plumbing changes can become expensive once construction is underway. Clear information allows the contractor to review the proposed locations early and identify any coordination issues before installation.
Quick Check
✔ Fixtures positioned
✔ Specifications included
✔ Cabinetry coordinated
6. Review Your Reflected Ceiling Plan
A reflected ceiling plan shows the layout of elements located on or within the ceiling.
This may include recessed lights, decorative fixtures, pendants, ceiling treatments, beams, soffits, speakers, smoke detectors, access panels, HVAC grilles, and other relevant features.
The plan should clearly show fixture positions and alignments, especially where lighting needs to coordinate with cabinetry, furniture, kitchen islands, dining tables, or architectural features.
Ceiling heights and changes in ceiling level should also be identified where they affect the interior design.
Why it matters:
Several trades may need to work within the same ceiling area. A coordinated reflected ceiling plan helps reduce clashes and prevents fixtures from being placed without considering the overall design.
✔ Ceiling layout complete
✔ Lighting aligned
✔ HVAC coordinated
7. Don't Forget Millwork Details
Custom cabinetry and millwork usually require more information than can be provided on a general floor plan or interior elevation.
Dedicated drawings may include plans, elevations, sections, dimensions, door and drawer layouts, shelving, paneling, hardware locations, appliance openings, lighting, and material references.
Complex pieces may also require enlarged details to explain transitions, profiles, internal construction, or the relationship with surrounding walls and finishes.
Final shop drawings and fabrication methods should be confirmed by the cabinetmaker or fabricator.
Why it matters:
Millwork is often a major investment and one of the most detailed parts of an interior project. Clear documentation reduces assumptions and gives the fabricator a stronger basis for pricing, shop drawings, and production.
Quick Check
✔ Cabinet details complete
✔ Hardware shown
✔ Construction details included
8. Add Enlarged Details
Some areas contain too much information to be shown clearly at the scale of the main drawing set.
Enlarged plans, elevations, sections, or details can be used for kitchens, bathrooms, fireplaces, stairs, built-ins, feature walls, tile transitions, and other complex areas.
These drawings should focus on the specific information required to understand the design, including critical dimensions, alignments, material transitions, clearances, and installation relationships.
Not every area needs an enlarged detail. They should be used where a standard drawing leaves room for uncertainty.
Why it matters:
Enlarged details allow complicated areas to be communicated clearly without overcrowding the main drawings. They help contractors focus on the information that requires additional attention.
Quick Check
✔ Complex areas enlarged
✔ Critical dimensions included
✔ Details easy to understand
9. Organize Materials & Finishes
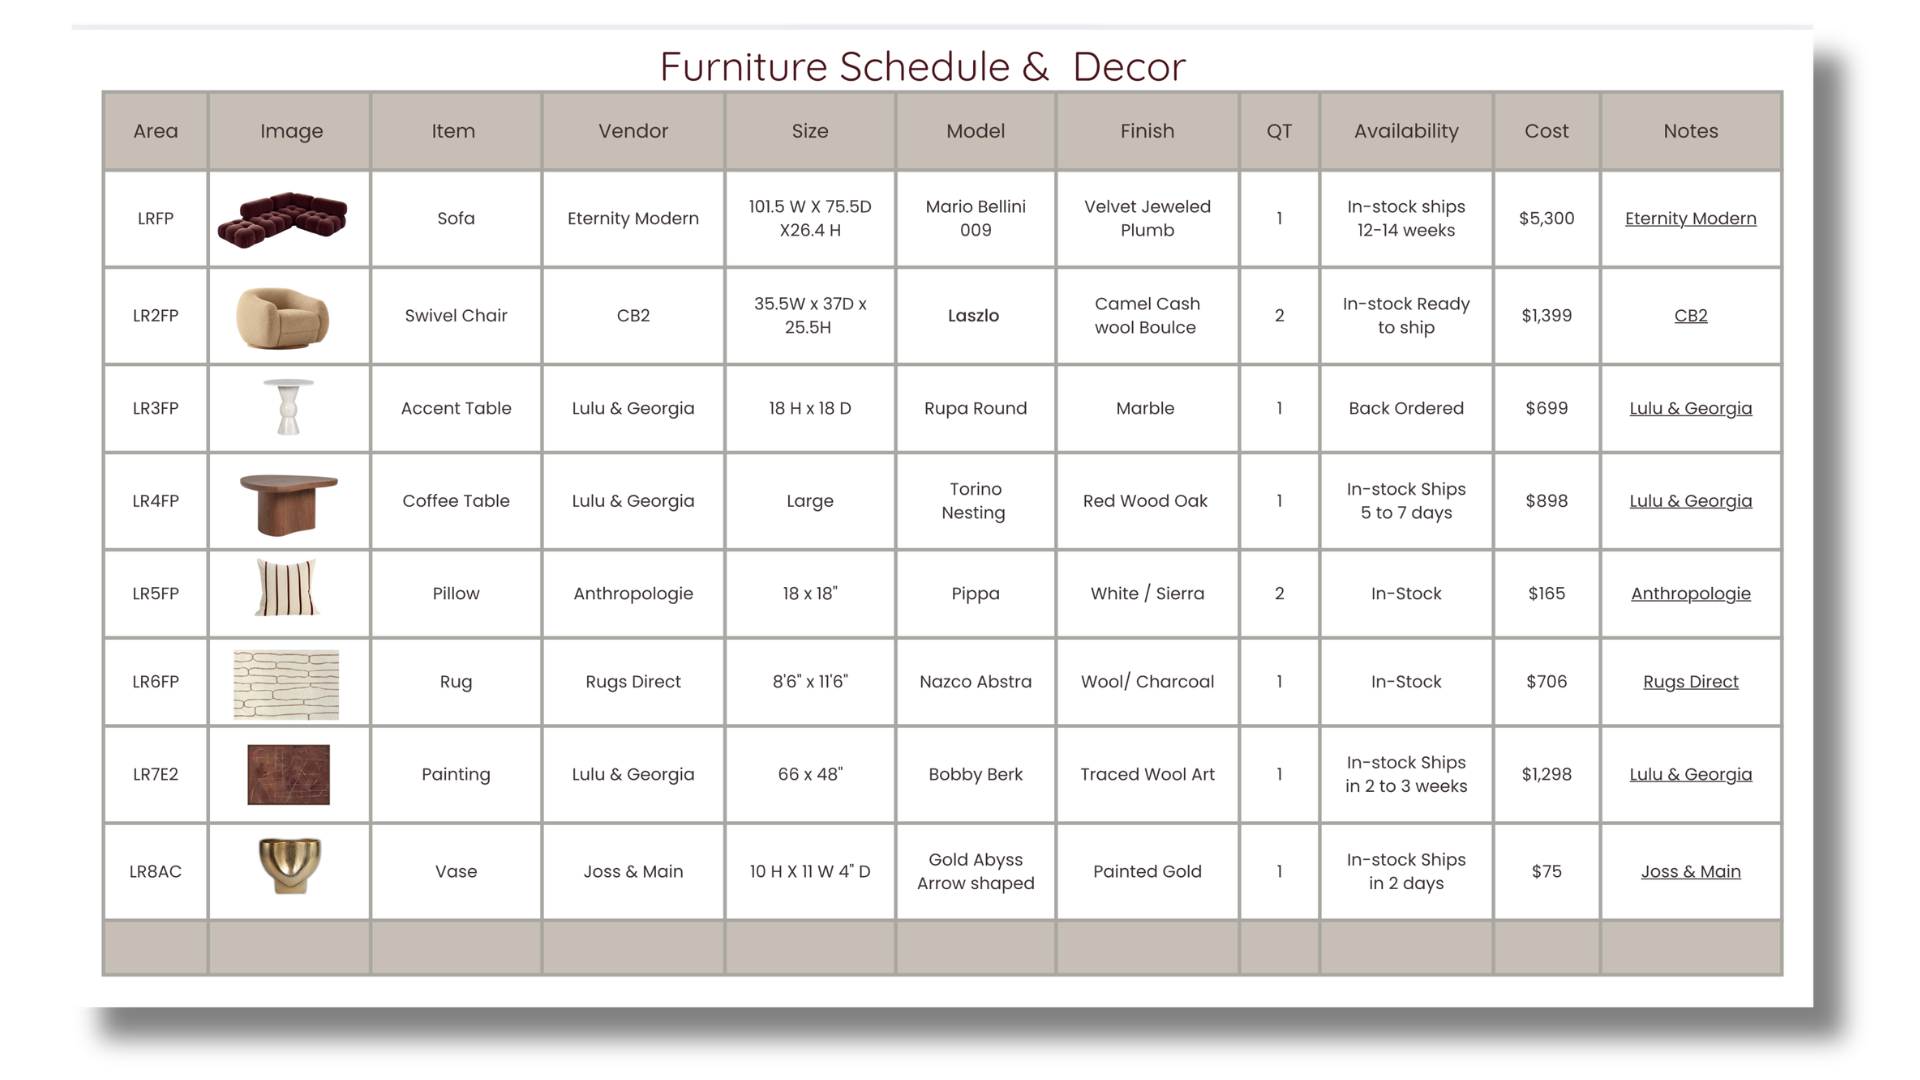
The drawing set should clearly identify the materials and finishes selected for each area.
This may include flooring, wall finishes, tile, paint, cabinetry finishes, countertops, hardware, plumbing fixtures, decorative lighting, trim, and other specified products.
Materials can be referenced through labels, finish codes, schedules, specifications, and notes. The same naming system should be used consistently throughout the full drawing package.
Product names, manufacturers, model numbers, sizes, finishes, and installation patterns should be included where available and relevant.
Why it matters:
Clear material references help prevent the wrong product from being ordered or installed. They also reduce the need for contractors to search through emails, presentations, and separate documents to identify the correct selection.
Quick Check
✔ Finish schedule complete
✔ Materials identified
✔ Product references included
10. Verify Appliance Information
Appliance selections should be documented when they affect cabinetry, plumbing, ventilation, electrical work, or installation clearances.
Include the manufacturer, model number, dimensions, and relevant product information for refrigerators, ovens, cooktops, dishwashers, microwaves, range hoods, washing machines, dryers, and other applicable appliances.
The drawings should show how appliances relate to surrounding cabinetry and countertops. Any required openings, panels, fillers, ventilation space, or service connections should be coordinated before fabrication.
Contractors should always verify the latest manufacturer specifications.
Why it matters:
Even small differences between appliance models can affect cabinetry and services. Providing accurate information early helps avoid modifications during installation.
Quick Check
✔ Models confirmed
✔ Openings coordinated
✔ Installation requirements reviewed
11. Include Visual References
Renders and sketches are not construction documents, but they can provide valuable visual context alongside the technical drawings.
They help contractors see the intended relationship between cabinetry, finishes, lighting, furniture, proportions, and architectural features.
A render can sometimes explain the overall design more quickly than reviewing several separate plans and elevations. Sketches can also be useful for communicating a specific feature, transition, or design idea that may be difficult to describe through notes alone.
Any difference between a visual and the technical documentation should be clarified before construction.
Why it matters:
Visual references help contractors understand the finished design intent and reduce the chance of different people interpreting the drawings in different ways. They are especially useful for custom or visually complex spaces.
Quick Check
✔ Latest renders included
✔ Sketches support technical drawings
✔ Design intent clearly communicated
12. Review Your Revision History
Changes should be recorded clearly so everyone can identify the most current version of the drawing package.
A revision log can include the revision number, issue date, drawing sheets affected, and a brief description of the changes.
Revised information should also be marked clearly on the relevant drawings using revision clouds, tags, or another consistent method.
Old versions should be removed from active project folders or clearly marked as superseded to reduce the risk of someone using outdated information.
Why it matters:
Projects often change during design and construction. A clear revision process helps contractors understand what has changed and reduces mistakes caused by working from an earlier drawing.
Quick Check
✔ Revision dates updated
✔ Changes identified
✔ Previous versions archived
13. Add General Notes
General notes provide important information that applies across several drawings without repeating the same instruction on every sheet.
These may include requirements for field verification, coordination with other trades, reporting discrepancies, protecting existing conditions, confirming dimensions before fabrication, and following manufacturer installation instructions.
Project-specific notes should be clear and relevant. Avoid filling the drawings with long standard notes that do not apply to the actual scope of work.
The notes should also make it clear when specialist review or approval is required.
Why it matters:
Well-written notes help establish expectations and remind everyone of important checks before work proceeds. They support the drawings without making them unnecessarily complicated.
Quick Check
✔ General notes reviewed
✔ Coordination notes included
✔ Site verification noted
Final Review Before Issuing the Drawing Set
Before sending the drawing package to the contractor, review it as though you are seeing the project for the first time.
Ask yourself:
Is the overall layout easy to understand?
Are all important rooms, walls, fixtures, and features clearly labeled?
Are the critical dimensions included and consistent?
Do the plans, elevations, and details agree with one another?
Are lighting, electrical, plumbing, and ceiling elements coordinated?
Are selected materials and products clearly identified?
Are appliance and fixture specifications included where required?
Have complex areas been shown at a larger scale?
Are the renders or sketches consistent with the technical drawings?
Is the latest revision clearly identified?
Could any part of the design be interpreted in more than one way?
Is it clear which information must be verified on site?
Would the contractor understand the designer’s intent without repeatedly requesting clarification?
A strong interior design drawing package does not need to contain every possible drawing. It needs to provide the right information for the project and communicate it clearly.
When drawings, specifications, and visual references work together, contractors can better understand the design, coordinate the work, and identify questions before they become problems on site